How to Carve Wood, a Fun and Rewarding Hobby ★


The Basics of Wood Carving
The very first thing you need to know before you start a wood carving project is Safety. You will be using a knife for any sort of wood carving and this could cause a serious injury if not handled safely.
First you want to handle your knife properly. You want to use your wrist while carving and not your elbow. You will have more control of the pieces of wood that you are talking off rather then taking large chunks and sending the blade through the air.
I always think about which way I am carving and try to carve away from my hands and body. I do not want to stab myself! You want to be cutting down and not across as you will be able to keep better control this way. You may also find that turning the wood while pressing down will mean that when you get to the side of your piece of wood the knife does not slip off. I would not recommend using the knife as a scraper as this dulls the knife, in addition prying the wood can break the tip of your blade.
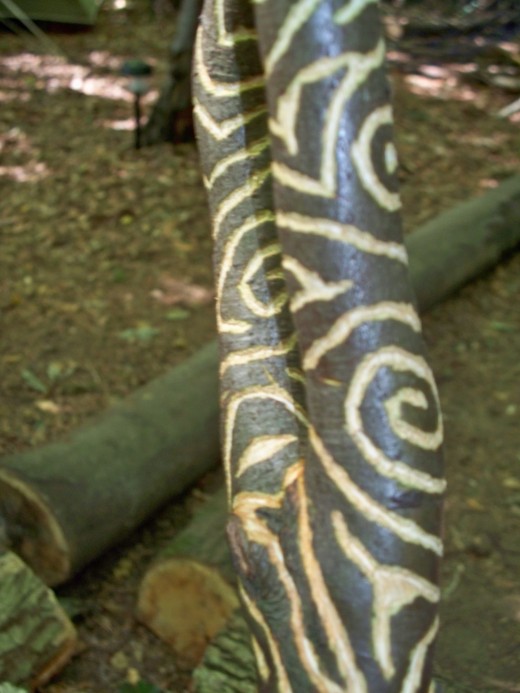
If you pencil in the patter you are hoping to carve you will avoid making mistakes that are hard to erase. Drawing a centerline for your cuts helps you to keep the cuts balanced. With the carving in the picture above I did not do this, instead I let the design emerge from the wood as I went along. You may not always have a plan in mind when you start carving so using a pencil is not always necessary.

Different Types of Wood when Carving
There are many different sorts of wood you can choose to carve with. I think the wood I used in the picture was Alder wood. Different types of wood will have different properties that will affect what you can carve. Beginners are often advised to start out with soft woods rather then hard woods. Basswood is a good wood for beginners because it is easy to carve, the close grain holds small carved detail.
The grain of the wood is very important to determine. Having your cuts go with the grain will be much easier to keep neat and tidy. Basswood will give you an easy carve, with fine to medium grain and a light cream color. Butternut has a light brown color and distinct grain pattern and as it is soft (and dents easily) it is another easy to carve with wood.
If you are ready for a slightly harder wood to carve with Mahogany is a great one. The dark reddish color is excellent for a natural finish sculpture. The grain and hardness of the wood is medium, not a great first choice but a great choice when you are confident.
Pine is another medium grained wood like Mahogany but is a much easier wood to carve with. This wood is aromatic and a lovely cream color. It is soft and good for whittling tho the growth rings may be difficult to cut through.
Great beginners project Video for wood carving, First in series
What do I need to get started?
You do not need loads of tools to get started carving. One knife is enough to get you started while you decide if you really want to keep on carving. An X-acto knife from any craft store is a good start, you just need a handle and a package of #11 blades. You do not want to start with a kitchen knife or pocket knife as you will dull them and with a pocket knife you will have less control, more danger of stabbing or cutting yourself. A dull knife of any sort is to be avoided as you will struggle with your cuts and may damage the wood ruining the pattern you hoped to carve.
When you are ready to buy a wood carving knife you are likely to have chosen a style of woodcarving. For whittling you can use a basic carving knife or whittling knife. You may want to add other knives as your skill improves.
Chip carving is the closest to the style I used when carving my first project. This method removes selected chips of wood to create a pattern. This is a great first style to learn as it can be free form or based on geometric shapes. I would strongly suggest this style to start with as you will only really use two or three knives of different sizes.
Another style is 'carving in the round'. This type of carving is completed all the way around and is more lifelike. Choosing the right tools for this type of carving is more involved as you will need a variety of knives, gouges as hand tools and chisels. This sort of carving is pretty advanced and as such is not something to rush into.
Relief Carving is slightly less involved then whittling or carving in the round. This type of carving is flat backed and the image is carved in 3 dimensions. Basic carving sets are fine to start with and you can add other tools as your skills improve. This seems like a great style of carving for a beginner as you can keep it simple and still produce a work of art.
A side shot of my first carving
Last bit of advice
Do not get discouraged! This is a hobby that takes time and practice to master and most people struggle with their first carving. Try instead to learn from your mistakes and use that learning in your next carving. Wood carvers are a friendly lot and its worth staying interested. Local wood carving clubs or courses will help you enjoy the art of wood carving and grow your skills into that of an accomplished woodcarving artist.
A great article on the history of wood carving!
- Wood Carving
Wood carving is one of the oldest forms of sculpture. Wood was used in ancient Egypt for figure sculpture and in Oriental countries for ornamenting temples and shrines. Wood carving has also been a prominent...


